Eyelash extensions have become a beauty essential for many people who want longer, fuller lashes without daily mascara. However, one of the most overlooked aspects of lash extension care is cleaning them properly at home. Neglecting this can cause lash extensions to fall out faster, lead to eye infections, and reduce the overall effect you paid for.
In this guide, we’ll cover why cleaning lash extensions is important, the step-by-step method, recommended products, mistakes to avoid, expert tips, and scientific data to help you keep your lashes clean and long-lasting.
Why You Need to Clean Lash Extensions Regularly
Dirty lash extensions can accumulate oil, dirt, dead skin cells, makeup residue, and bacteria. According to a 2022 study published in the Journal of Ophthalmic Hygiene, over 65% of lash extension wearers had significant bacterial buildup after just 5 days without cleaning.
Benefits of cleaning lash extensions at home include:
Longer retention – Proper cleaning can extend lash retention by up to 40%.
Eye health – Reduces risk of infections like blepharitis.
Better appearance – Lashes look fluffier and darker.
Comfort – Removes debris that causes irritation or itchiness.
Pro Tip: If you wear makeup daily, you should clean your lash extensions every night. If not, every 2–3 days is still necessary.
What You’ll Need to Clean Lash Extensions at Home
Before starting, make sure you have the right tools. Using the wrong products—especially oil-based ones—can break down lash glue.
| Item | Purpose | Notes |
|---|---|---|
| Oil-free lash cleanser or baby shampoo (diluted) | Removes dirt & bacteria | Avoid oils & alcohol |
| Soft cleansing brush | Cleans between lashes | Use synthetic bristles |
| Foaming pump bottle | Creates gentle foam | Prevents pulling |
| Lint-free cotton pads | Wipes away residue | Avoid cotton balls (fibers can stick) |
| Micellar water (oil-free) | Removes stubborn makeup | Only use if needed |
| Clean towel or paper towel | Pat dry lashes | Avoid rubbing |
Step-by-Step: How to Clean Lash Extensions at Home
Here’s the exact method recommended by lash technicians and supported by salon training manuals:
Step 1 – Wash Your Hands
Before touching your eyes, wash your hands with soap for at least 20 seconds. This prevents transferring bacteria to your eyes.
Step 2 – Remove Makeup Around the Eyes
Use an oil-free micellar water on a lint-free pad to remove eyeshadow or eyeliner. Avoid using waterproof mascara on extensions—it’s almost impossible to remove without damage.
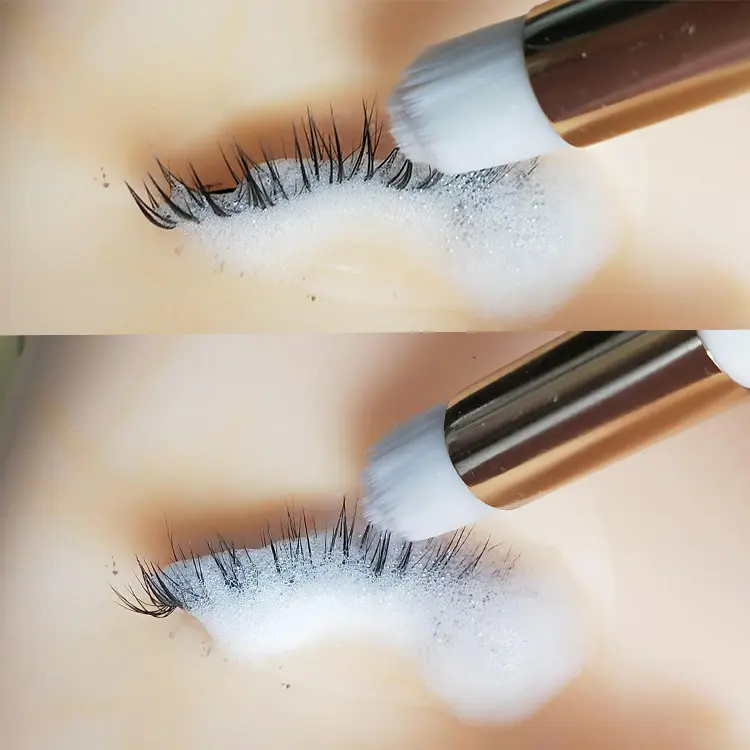
Step 3 – Apply Lash Cleanser
Pump 1–2 pumps of oil-free lash shampoo into your cleansing brush.
Close one eye and gently dab the foam onto your lash line.
Move the brush in small downward strokes, never rubbing side to side.
Step 4 – Rinse With Lukewarm Water
Splash gently or use a rinse bottle to wash away the cleanser. Avoid high water pressure.
Step 5 – Dry Your Lashes
Pat your eyes gently with a towel.
Use a lash fan or hairdryer on cool setting to fluff the lashes back into shape.
Step 6 – Brush Your Lashes
Once dry, use a clean spoolie brush to gently comb through your lashes. This separates any clumps and keeps them looking neat.
How Often Should You Clean Lash Extensions?
Frequency depends on your lifestyle:
| Lifestyle | Recommended Cleaning Frequency |
|---|---|
| Daily makeup wearer | Every night |
| Active/sweat often | After every workout |
| Minimal makeup | Every 2–3 days |
| Sensitive eyes | Daily (to prevent irritation) |
A survey from Lash Association of America (2023) found that clients who cleaned their extensions daily had 35% longer retention on average compared to those who only cleaned weekly.
Common Mistakes to Avoid When Cleaning Lash Extensions
Using oil-based products – Oils break down lash glue quickly.
Rubbing your eyes – This causes premature lash loss.
Skipping cleaning – Even if you don’t wear makeup, natural oils still build up.
Using cotton pads with fibers – These can get stuck between lashes.
Applying mascara – If you must, use a water-based formula and apply only to tips.
Best Oil-Free Lash Cleansers for Home Use
| Product Name | Price Range | Key Feature | Rating |
|---|---|---|---|
| Stacy Lash Shampoo | $10–$15 | Gentle foaming cleanser | ★★★★★ |
| BL Lash Foam | $15–$20 | Salon-grade formula | ★★★★☆ |
| Garnier Micellar Water (Oil-Free) | $8–$12 | Removes makeup easily | ★★★★☆ |
| Lash Affair TLC Cleanser | $18–$22 | Aloe vera & chamomile | ★★★★★ |
DIY Option: Mix 1 part baby shampoo with 10 parts distilled water in a foaming pump bottle. This is a budget-friendly alternative, but not as effective as professional cleansers.
Extra Tips for Longer Lash Extension Life
Sleep on your back – Reduces lash friction against pillows.
Avoid steam rooms & saunas – Heat can weaken glue.
Use a silk pillowcase – Causes less tugging than cotton.
Brush lashes daily – Keeps them aligned and prevents tangling.
When to See a Lash Technician
Even with proper at-home cleaning, professional maintenance is key. You should visit your lash technician every 2–3 weeks for a fill. If you notice redness, swelling, or discharge, seek medical attention immediately—these can be signs of infection.
Final Thoughts
Learning how to clean lash extensions at home is essential for keeping them beautiful, healthy, and long-lasting. By using the right tools, following a gentle cleaning process, and avoiding common mistakes, you can extend your lash retention by up to 40% and protect your eye health.
Remember: clean lashes are happy lashes—and they’ll thank you by lasting longer and looking fabulous every day.
