Magnetic eyelashes for beginners

The Ultimate Beginner's Guide to Mastering Magnetic Eyelashes
Tired of fiddling with messy lash glue, waiting for it to get "tacky," and the dreaded moment of misplacement that ruins your entire eye look? Magnetic eyelashes promise a revolutionary alternative: the ease of a snap-on system without the sticky, frustrating application. For beginners, however, the concept can seem just as daunting as traditional lashes. How do these tiny magnets work? Will they really stay on? Fear not. This in-depth, 1000+ word guide will walk you through every single step, from purchasing your first set to applying them like
a seasoned pro.
Some beauties are so interested in the magnetic lashes,and how they want to wear for the magnetic lashes,so they buy.But after they try,they feel it is very hard to wear them on,so they do not think the magnetic lashes are good.Acturally they are absolutely wrong,the magnetic lashes are very good and very easy to wear,the only problem is,they do not know how to put them on.For beginners,need to practising more times,then will be easily wear.Below let’s study together to wear the magnetic eyelashes:

Part 1: Understanding the Magnetic Lash System
Before you even touch your eyelids, it's crucial to understand what you're working with. There are two primary types of magnetic lash systems, and knowing the difference is your first step to success.
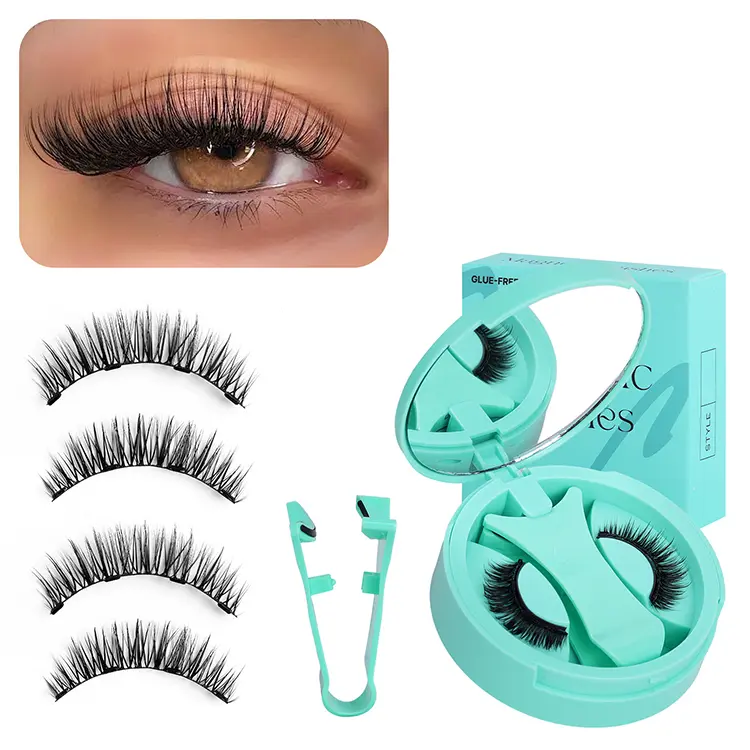
1. The Eyeliner-Based System (Recommended for Beginners)This is the most popular and beginner-friendly system. It consists of two components:
· •The Magnetic Eyeliner: This is a special liquid eyeliner infused with tiny magnetic particles. It looks and applies like a standard liquid liner but has the crucial property of attracting magnets.
· •The Magnetic Lash Strip: The lash strip itself has small, powerful magnets embedded along its band. When you bring the lash strip close to the magnetic liner, it snaps into place.
Why it's great for beginners: The liner acts as a "track" for your lashes. You can see exactly where you're placing the liner, which gives you much more control than trying to align two separate lash strips simultaneously. It also doubles as your eyeliner, making it a efficient part of your makeup routine.
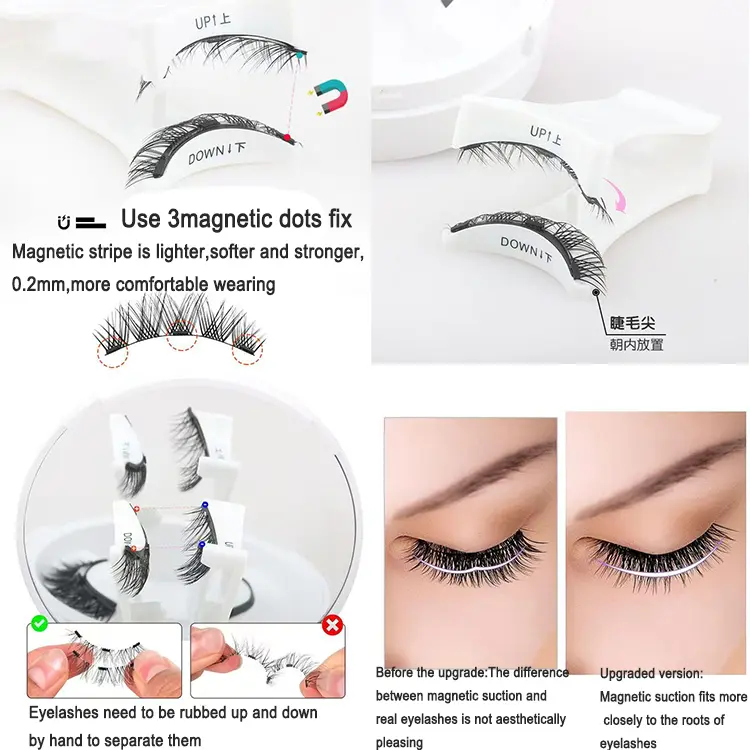
2. The Sandwich System (The Original Method)This older system does not require magnetic eyeliner. Instead, it uses two separate lash strips for each eye.
· •How it works: One lash strip has magnets with the north pole facing up, and the other strip has magnets with the south pole facing up. You place one strip on top of your natural lashes and the other underneath, and the magnets attract each other, "sandwiching" your natural lash line in between.
Why it can be challenging for beginners: This method requires significant dexterity. Aligning two separate strips from above and below your lash line can be tricky and often feels bulky. The eyeliner-based system has largely surpassed this in popularity due to its simplicity.For the remainder of this guide, we will focus exclusively on the Eyeliner-Based System, as it is the most accessible starting point.
Part 2: Pre-Application Preparation – Setting the Stage for Success
Preparation is 90% of the battle. A clean, primed eyelid is non-negotiable for a secure hold.
Step 1: Assemble Your ToolsGather everything you need before you start:
· •Your magnetic eyeliner and lash set.
· •Eyelash applicator (usually included; if not, a pair of tweezers dedicated to makeup use).
· •A small hand mirror (to look down into).
· •Q-tips and micellar water or makeup remover (for clean-up).
· •Your usual eye makeup products (primer, eyeshadow, etc.).
Step 2: Prep Your Eyelids
· •Start with a Clean Canvas: Ensure your eyelids are free of any oils, moisturizers, or old makeup. Any residue can prevent the magnetic liner from adhering properly.
· •Apply Eye Primer (Highly Recommended): An eyeshadow primer will create a smooth, even, and matte base. This helps your eyeshadow look better and gives the magnetic liner something extra to grip onto, enhancing its longevity.
· •Apply Your Eyeshadow: Do your eyeshadow as you normally would. It’s best to apply the magnetic liner on top of your eyeshadow, not on bare skin.
Part 3: The Step-by-Step Application Process
This is the core of the guide. Take your time with each of these steps.
Step 1: The Perfect Liner ApplicationThis is the most critical step. A well-applied liner is the foundation for perfect lash placement.
· •Shake the Liner: Shake the magnetic liner pen vigorously for 10-15 seconds. This ensures the magnetic particles are evenly distributed throughout the liquid.
· •Start Thin, Build Thick: Begin by drawing a thin line as close to your upper lash line as possible. Don't worry about perfection yet. The goal of this first pass is to create a base guide.
· •Create the "Magnetic Track": Now, go over the initial thin line and build it up. You need to create a line that is thick enough for the magnets on the lash strip to make full contact. A wispy, hair-thin line will not provide enough surface area for a strong hold. Aim for a line with the thickness of a standard winged liner or slightly thicker.
· •Smoothness is Key: Try to make the line as smooth and even as possible. Any bumps or gaps will create weak spots where the magnets can't attach.
· •WAIT FOR IT TO DRY – BUT NOT FULLY: This is the most common point of failure. The liner must be tacky to the touch but not wet. If it's wet, the lash will slide around. If it's bone dry, the magnetic attraction will be weak.
o •The Test: Gently tap the liner with the tip of a Q-tip. If it comes away clean or only slightly tinted, and the liner feels sticky, it's ready. This usually takes 30-60 seconds, depending on the formula.
Step 2: Positioning the Lash Strip
· •Look Down: Use your hand mirror and position it so you are looking down into it. This gives you the best view of your entire lash line without having to close your eye completely (which can crease the liner).
· •Pick Up the Lash Correctly: Using your lash applicator or tweezers, gently pick up the magnetic lash strip from the center. Hold it horizontally, parallel to your eye.
· •Identify the Eye: The lash strip should be slightly longer on the outer edge. The shorter end goes toward your inner corner.
Step 3: The "Snap-On" Moment
· •Start in the Center: This is the golden rule. Instead of trying to align the inner or outer corner first, hover the center magnet of the lash strip just above the center of your magnetic liner.
· •Gently Lower and Release: Gently lower the center of the lash onto the center of your liner. You should feel a slight magnetic pull as it gets close. Let it snap into place.
· •Attach the Ends: Once the center is securely on, it becomes incredibly easy. Simply press the inner corner of the lash onto the liner, then press the outer corner into place. The lash is now "anchored," so the ends will align perfectly.
Step 4: Securing the Hold and Final Adjustments
· •Press Gently: Use your fingers or the blunt end of your applicator to gently press along the entire lash band, ensuring every magnet has made full contact with the liner. Press from above; do not try to lift the lash.
· •The Mirror Test: Look straight ahead into a mirror. Check for any gaps between the lash band and your lash line. If you see a gap, gently nudge the lash band down with your applicator.
· •Clean-Up: If you got any liner on the lashes themselves or made a mistake, use a Q-tip dipped in micellar water to carefully clean it up immediately.
Part 4: Removal and Aftercare – Making Your Lashes Last
How you remove your lashes is just as important for their longevity.
Step 1: Gentle RemovalDO NOT PULL THE LASHES OFF FROM THE ENDS. This can bend the lash band and weaken the magnets.
· •The correct method is to grip the very center of the lash band with your applicator or fingers and gently pull it straight up and away from your eyelid. It should release easily.
Step 2: Cleaning the Lashes
· •Use a Q-tip with a small amount of oil-free makeup remover or micellar water to gently wipe the magnetic band of the lash, removing all traces of the magnetic liner.
· •Do not submerge the lashes in liquid or rub the actual lash fibers aggressively, as this can cause them to shed.
Step 3: Storing Your Lashes
· •Always place them back into their original storage case. This protects their shape and prevents dust from accumulating on them. With proper care, a good pair of magnetic lashes can be worn 30+ times.
Part 5: Troubleshooting Common Beginner Problems
· •Problem: The outer corner won't stay down.
o •Solution: You likely didn't apply enough liner on the outer corner. The liner layer might be too thin there. Next time, ensure the liner is built up evenly across the entire lash line.
· •Problem: The lashes feel heavy or uncomfortable.
o •Solution: This is common when you're not used to wearing lashes. Start by wearing them for short periods at home to acclimatize. Also, ensure you have chosen a style that isn't overly dense or long; opt for "natural" or "wispy" styles to begin with.
· •Problem: There's a visible gap between the lash band and my lash line.
o •Solution: This is usually an application error. Remember to start in the center. You can also tightline your upper waterline with a black eyeliner pencil before applying the magnetic liner. This darkens the base and makes any tiny gaps virtually invisible.
· •Problem: The magnets don't seem strong enough.
o •Solution: Double-check that your liner is the correct, tacky-dry stage. If it's wet or fully dry, the hold will be weak. Also, ensure you are using a high-quality magnetic liner from a reputable brand.
Conclusion: Practice Makes PerfectMagnetic eyelashes are a fantastic beauty innovation, but like any skill, they require practice. Your first attempt might not be flawless, and that's perfectly okay. The key is to be patient and not get discouraged. Set aside 15-20 minutes when you're not in a rush—perhaps on a lazy Sunday afternoon—to practice the steps. Within a few tries, the process will become second nature. Soon, you'll be able to apply a full set of gorgeous, glue-free lashes in under a minute, unlocking a new world of effortless glamour. Happy applying
Elourlashes factory is the most professional magnetic eyelashes manufacturer from the start of the magnetic lashes for about 10years.We manufacture all kinds of the magnetic lashes,can satisfy all your need.